For You
Click for more
2. CESR Procedure
CESR Application Flow
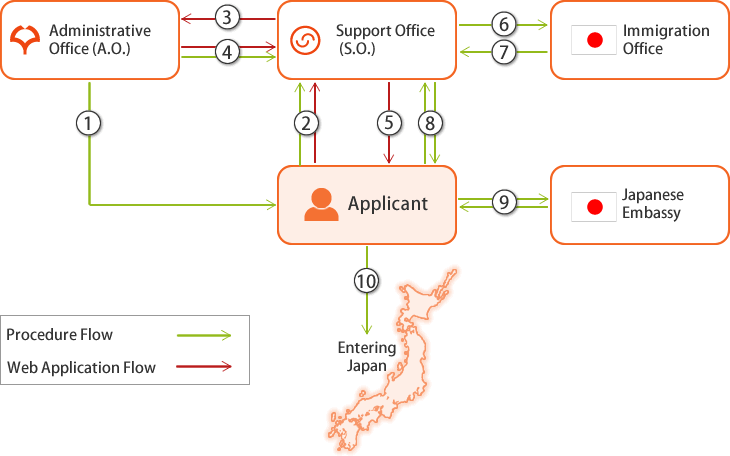
- A.O. –> Applicant
Applicant receives the following documents from A.O. of Osaka University by email.
Form 1: Information of Visa Application
Form 2: Information Sheet for CESR Web Application and Visa Application Form - Applicant –> S.O.
After Applicant receives Form 1 and Form 2, complete Web Application and send the required documents through the URL which is in the email which you receive when you complete the web application. When you cannot attach your document’s data on the system, you can also send the documents by email or postal mail. - S.O. –> A.O.
S.O. sends the applicant’s information to A.O. - A.O. –> S.O.
A.O. checks the information and gives approval. When the applicant is not the expected person, A.O. can reject the application. After the approval, A.O. sends required documents to S.O. - S.O. –> Applicant
S.O. sends an email to Applicant when the application is ready to submit. - S.O. –> Immigration Office
S.O. applies for CESR to the Immigration Office - Immigration Office –> S.O.
Immigration Office sends CESR issuance email to S.O. - S.O. –> Applicant
S.O. forwards CESR issuance email. - Applicant <-> Japanese Embassy or Consulate
Applicant applies for Visa to the Japanese Embassy or Consulate with Visa application form, ID photo, Passport, CESR issuance email and other required documents. - Applicant
Enter Japan with a visa (passport) and CESR issuance email*.
*Note: The body of this email acts as your CESR, so either display the email on your smartphone or print out a hard copy in advance.
CESR Application Procedure
- Applicant receives the following documents from the administrative office of the school/faculty/graduate school/institute/center of Osaka University.
Form 1: Information of Visa Application
Form 2: Information Sheet for CESR Web Application and Visa Application Form
*A.O. Will fill out Form 2 before sending it to the Applicant. - Applicant enters the required personal information on the CESR Web Application System.
- Applicant can submit the required documents to S.O. via the URL located in the confirmation email following the completion of their registration on the Web Application System.
Regarding the required documents, the detail information is on Form 1.
[Important] Regarding your CESR
The email that you receive from the Immigration Bureau acts as your CESR, so when applying for your visa and entering Japan, please either display the email on your smartphone or print out a hard copy in advance.
Click here to view a sample.
Application for your visa to the Japanese embassy or consulate
- After receiving your CESR, apply for a visa with the required documents to the Japanese embassy or consulate.
*Contact the Japanese Embassy or Consulate in advance regarding the required documents. - Your visa will be issued by the Japanese embassy or consulate.
Entering Japan
- Enter Japan with your passport, visa and CESR.
- The Immigration officer will put a Landing Permission seal on your passport, which shows the date of landing, the period of stay, and your status of residence. When your duration is longer than 3 months, a residence card will be issued. Be sure to confirm if your status of residence and period of stay on the landing permission seal and the residence card is correct.
- Those who are granted “Student” status with the permitted period of more than 3 months can apply for the “permission to engage in activity other than that permitted under the status of residence previously granted” after you receive a landing permission.
Click here for “permission to engage in activity other than that permitted under the status of residence previously granted”
share !